Haltech Nexus R3 pinout
ecurecovery.com/pinouts/haltech/nexus-r3 · Every pin checked against 2 Haltech documents · data checked 2026-11-01
Haltech Nexus R3 pinout
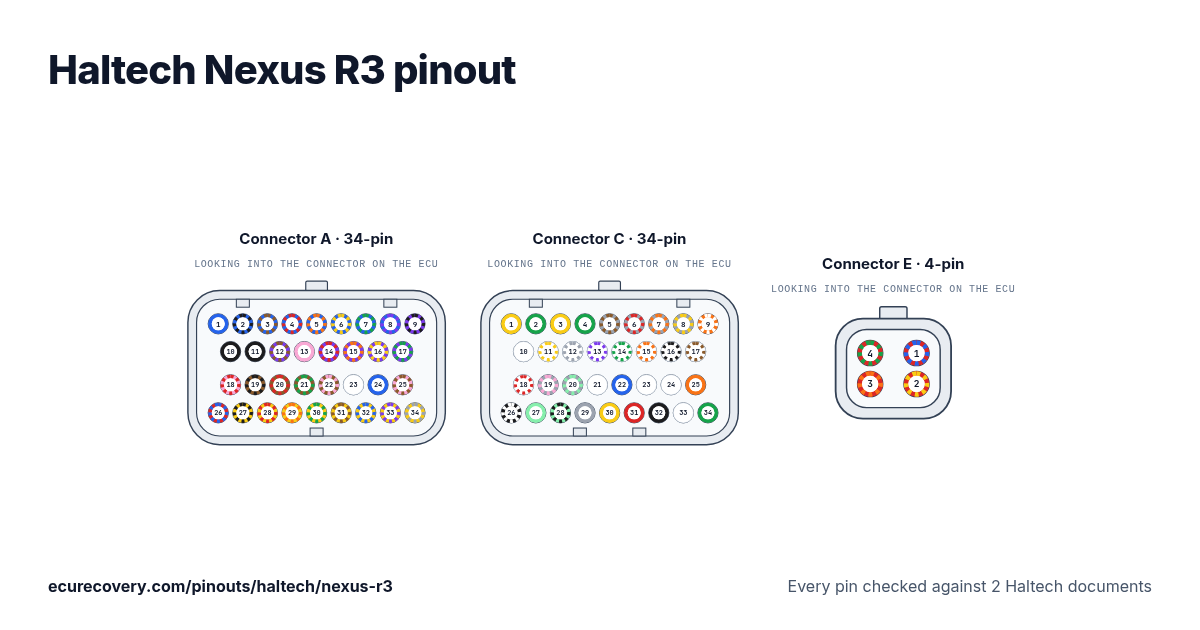
Every pin of the 34-pin A and 34-pin C connectors, with the wire colours of Haltech's harness. Tap a pin to see what it does.
Every pin checked against 2 Haltech documentsPick any pin on the drawing or in the table to see its function, its wire colour and the documents it was checked in.
Haltech Nexus R3 connector A pinout (34-pin)
| Pin | Function | Wire |
|---|---|---|
| A1 | Injector 1 | LBlue |
| A2 | Injector 2 | L/BBlue with black stripe |
| A3 | Injector 3 | L/BRBlue with brown stripe |
| A4 | Injector 4 | L/RBlue with red stripe |
| A5 | Injector 5 | L/OBlue with orange stripe |
| A6 | Injector 6 | L/YBlue with yellow stripe |
| A7 | Injector 7 | L/GBlue with green stripe |
| A8 | Injector 8 | L/VBlue with violet stripe |
| A9 | DPO 1 | V/BViolet with black stripe |
| A10 | Battery Ground Output | BBlack |
| A11 | Battery Ground Output | BBlack |
| A12 | DPO 2 | V/BRViolet with brown stripe |
| A13 | Ignition Switch Input | PPink |
| A14 | DPO 3 | V/RViolet with red stripe |
| A15 | DPO 4 | V/OViolet with orange stripe |
| A16 | DPO 5 | V/YViolet with yellow stripe |
| A17 | DPO 6 | V/GViolet with green stripe |
| A18 | +12V (HBO 5, see page 12) | P/RPink with red stripe |
| A19 | HBO 1 | BR/BBrown with black stripe |
| A20 | HBO 2 | BR/RBrown with red stripe |
| A21 | HBO 3 | BR/GBrown with green stripe |
| A22 | HBO 4 | BR/PBrown with pink stripe |
| A23 | CAN1 H | WWhite |
| A24 | CAN1 L | LBlue |
| A25 | +12V (HBO 6, see page 12) | P/BRPink with brown stripe |
| A26 | +12V Low Current Output | R/LRed with blue stripe |
| A27 | Ignition 1 | Y/BYellow with black stripe |
| A28 | Ignition 2 | Y/RYellow with red stripe |
| A29 | Ignition 3 | Y/OYellow with orange stripe |
| A30 | Ignition 4 | Y/GYellow with green stripe |
| A31 | Ignition 5 | Y/BRYellow with brown stripe |
| A32 | Ignition 6 | Y/LYellow with blue stripe |
| A33 | Ignition 7 | Y/VYellow with violet stripe |
| A34 | Ignition 8 | Y/GYYellow with grey stripe |
Haltech Nexus R3 connector C pinout (34-pin)
| Pin | Function | Wire |
|---|---|---|
| C1 | Trigger + | YYellow |
| C2 | Trigger - | GGreen |
| C3 | Home + | YYellow |
| C4 | Home - | GGreen |
| C5 | SPI 1 | GY/BRGrey with brown stripe |
| C6 | SPI 2 | GY/RGrey with red stripe |
| C7 | SPI 3 | GY/OGrey with orange stripe |
| C8 | SPI 4 | GY/YGrey with yellow stripe |
| C9 | +8V Sensor Power | O/WOrange with white stripe |
| C10 | AVI 1 | WWhite |
| C11 | AVI 2 | W/YWhite with yellow stripe |
| C12 | AVI 3 | W/GYWhite with grey stripe |
| C13 | AVI 4 | W/VWhite with violet stripe |
| C14 | AVI 5 | W/GWhite with green stripe |
| C15 | AVI 6 | W/OWhite with orange stripe |
| C16 | AVI 7 | W/BWhite with black stripe |
| C17 | AVI 8 | W/BRWhite with brown stripe |
| C18 | AVI 9 | W/RWhite with red stripe |
| C19 | SPI 5 | GY/PGrey with pink stripe |
| C20 | SPI 6 | GY/LGGrey with light green stripe |
| C21 | CAN2 H | WWhite |
| C22 | CAN2 L | LBlue |
| C23 | Knock 1 | WWhiteShielded |
| C24 | Knock 2 | WWhiteShielded |
| C25 | +5V Sensor Power | OOrange |
| C26 | Signal Ground | B/WBlack with white stripe |
| C27 | AVI 10 | LGLight green |
| C28 | AVI 11 | LG/BLight green with black stripe |
| C29 | 1: WB Heater + | GYGrey |
| C30 | 2: WB Input | YYellow |
| C31 | 3: WB Pump | RRed |
| C32 | 4: WB Nernst | BBlack |
| C33 | 5: WB Heater - | WWhite |
| C34 | 6: WB Cal | GGreen |
Haltech Nexus R3 connector E pinout (4-pin)
| Pin | Function | Wire |
|---|---|---|
| E1 | +12V Injector (25A-HCO 1) | R/LRed with blue stripe |
| E2 | +12V Ignition (25A-HCO 2) | R/YRed with yellow stripe |
| E3 | 25A-HCO 3 | R/ORed with orange stripe |
| E4 | 25A-HCO 4 | R/GRed with green stripe |
Haltech Nexus R3 pins at a glance
- Which pins are CAN on the Haltech Nexus R3?
- CAN1 H: pin A23 (White, W). CAN1 L: pin A24 (Blue, L). CAN2 H: pin C21 (White, W). CAN2 L: pin C22 (Blue, L).
- Which pins are the crank and cam inputs on the Haltech Nexus R3?
- Trigger +: pin C1 (Yellow, Y). Trigger -: pin C2 (Green, G). Home +: pin C3 (Yellow, Y). Home -: pin C4 (Green, G).
- Which pins are the injector outputs on the Haltech Nexus R3?
- Injector 1: pin A1 (Blue, L). Injector 2: pin A2 (Blue with black stripe, L/B). Injector 3: pin A3 (Blue with brown stripe, L/BR). Injector 4: pin A4 (Blue with red stripe, L/R). Injector 5: pin A5 (Blue with orange stripe, L/O). Injector 6: pin A6 (Blue with yellow stripe, L/Y). Injector 7: pin A7 (Blue with green stripe, L/G). Injector 8: pin A8 (Blue with violet stripe, L/V).
- Which pins are the ignition outputs on the Haltech Nexus R3?
- Ignition 1: pin A27 (Yellow with black stripe, Y/B). Ignition 2: pin A28 (Yellow with red stripe, Y/R). Ignition 3: pin A29 (Yellow with orange stripe, Y/O). Ignition 4: pin A30 (Yellow with green stripe, Y/G). Ignition 5: pin A31 (Yellow with brown stripe, Y/BR). Ignition 6: pin A32 (Yellow with blue stripe, Y/L). Ignition 7: pin A33 (Yellow with violet stripe, Y/V). Ignition 8: pin A34 (Yellow with grey stripe, Y/GY).
- Which pins are ground on the Haltech Nexus R3?
- Battery Ground Output: pins A10, A11 (Black, B). Signal Ground: pin C26 (Black with white stripe, B/W).
- Which pins power the Haltech Nexus R3?
- Ignition Switch Input: pin A13 (Pink, P).
- Which pins are the sensor supplies on the Haltech Nexus R3?
- +8V Sensor Power: pin C9 (Orange with white stripe, O/W). +5V Sensor Power: pin C25 (Orange, O).
- Which pins are the wideband sensor connections on the Haltech Nexus R3?
- 1: WB Heater +: pin C29 (Grey, GY). 2: WB Input: pin C30 (Yellow, Y). 3: WB Pump: pin C31 (Red, R). 4: WB Nernst: pin C32 (Black, B). 5: WB Heater -: pin C33 (White, W). 6: WB Cal: pin C34 (Green, G).
Haltech Nexus R3 pinout sheet
A printable sheet with the connector drawings and every pin, made from the checked data on this page.
Where this comes from
Only Haltech's own documents. Pin names and notes are written exactly as Haltech writes them.
Haltech harness quick start guide
Haltech wiring diagram
Haltech wire colour codes
- B = Black
- BR = Brown
- G = Green
- GY = Grey
- L = Blue
- O = Orange
- P = Pink
- R = Red
- V = Violet
- Y = Yellow
- W = White
- LG = Light green
Two letters: the first is the wire colour, the second is the stripe.
How we checked it
- We start from Haltech's pinout table for this ECU.
- We read every pin again from a second Haltech document, the wiring diagram or the quick start guide. A script compares the two, pin by pin.
- A pin is only shown when its function and its wire colour match in both. Where a diagram has no text to read, we read the pins off the drawing itself.
- The notes are Haltech's own words from its pinout table.
Where Haltech's documents disagree
C23: Haltech's R3 harness guide lists the colour of the shielded knock cable (Black/Blue); the R3 wiring diagram shows the knock signal as the white core inside that 2-core cable. We show both: a white core in a black/blue cable.
C24: Haltech's R3 harness guide lists the colour of the shielded knock cable (Black/Green); the R3 wiring diagram shows the knock signal as the white core inside that 2-core cable. We show both: a white core in a black/green cable.
ECU Recovery is not affiliated with Haltech. Haltech and Elite are trademarks of Haltech. If your harness came with its own diagram, check your wiring against it.
More Haltech pinouts
- Haltech Elite 550 pinout
- Haltech Elite 750 pinout
- Haltech Elite 950 pinout
- Haltech Elite 1000 pinout
- Haltech Elite 1500 pinout
- Haltech Elite 2000 pinout
- Haltech Elite 2500 pinout
- Haltech Elite VMS / VMS T pinout
- Haltech Nexus T1 pinout
- Haltech Nexus T2 pinout
- Haltech Nexus S2 pinout
- Haltech Nexus S3 pinout
- Haltech Nexus R5 pinout
- Haltech Platinum Sport 1000 pinout
- Haltech Platinum Sport 2000 pinout
- Haltech Platinum Sprint 500 pinout
- Haltech Platinum Sprint RE pinout
- All Haltech pinouts →
Have a Haltech map file? Open it in the free Haltech map viewer.
Map locked with a password?
We unlock Haltech, MaxxECU, LinkECU, Vi-PEC, ECUMaster, Emtron and FuelTech maps. You see proof from your own file first and only pay $159.99 if it works.
Unlock a map